Saturday, July 12, 2008

French Onion Soup & Roasted Chicken

Sooooo, when I said okonomiyaki, I meant French onion soup and roasted chicken. I couldn't find the time to get to Nijiya Market, so BLAH. Here goes:


For the soup, our vegetables: Two medium-large onions, 1 sprig of fresh thyme, 2 bay leaves, and 2 cloves of garlic.


For the chicken: One chicken breast, skin-on and bone-in. Roasting chicken with the bone in makes it a lot juicier than skinless and boneless chicken. You can always peel the skin off later too.


So in a large pot or wok over medium heat, sautee the onions in two tablespoons of butter with the thyme, bay leaves, and garlic until softened and carmelized.


While that cooks, preheat the oven to 400 and prepare the chicken by rubbing it liberally with olive oil, salt, and pepper. Feel free to add other herbs and spices to your liking, such as oregano or rosemary, but you'd be surprised how flavorful good chicken can be just roasted with salt and pepper.

When the oven is heated, roast the chicken for around 40 minutes while you make the soup.


After around 25 to 30 minutes, stirring occasionally, your onions will be nice and caramelized.


As you can see, they cook down quite a bit.


Add around a cup of red wine, and turn the heat to high to bring to a boil. When the wine is boiling, bring the heat back down to around medium and cook until the alcohol cooks out and wine evaporates.


This will take around 10 minutes or so.


Fish out the thyme and the bay leaves, and then sprinkle the onions with two tablespoons of flour. Stir liberally to break up any lumps, and cook for another 10 minutes.


The flour will combine with the wine to form a nice and flavorful coating over your onions.


Then we add 1 quart of beef stock, and bring to a simmer.


Cook for another 10 minutes, and season to your liking.


The classic preparation of this soup begins by pouring a serving into an small crock pot or similar oven safe bowl like the one above. Make sure to leave about half an inch from the top of the bowl for the bread and cheese.


Place a slice of toasted French baguette and layer gruyere cheese over it. Be sure to toast the bread first, or it will immediately sop up the soup and become soggy.


A couple minutes under the broiler, and the cheese melts nicely around the bread.


Garnish with a sprig of thyme because it looks awesome.


By then, your chicken will be nicely golden brown. Serve along-side brown rice and salsa.


You can see how juicy the chicken is when you leave the skin and bone on.


Nom.

---

Oh, and my bonsai tree fails. I'm beginning to think the seeds never sprouted.

TEAR.

Sunday, July 6, 2008

Steak

I'm working on a pretty effects-intensive commercial this weekend, so I won't have time to post a step-by-step for anything new. Sumimasen~

But I will be gathering ingredients throughout the week for okonomiyaki. So look for that this weekend! And... no bonsai update either because... well... it looks exactly the same.

Anyway, seeing as how Friday was independence day, I decided to be uberly American and make a steak.


This is around a 12oz. rib-eye steak with a red-wine & beef-broth reduction sauce with sauteed mushrooms and potatoes roasted in a red-pepper and sun-dried tomato pesto.


With steaks, the general idea is to start on high heat, and with a steak that's room temperature. If you take a steak straight out of the fridge and onto the pan, it'll cool the pan down too quickly, and you won't be able to get a nice sear.


For medium done-ness, as pictured above, it'll take around three or four minutes on each side on medium-high to high heat. Of course, this varies depending on the thickness of your steak (mine was about a half-inch), your range (gas, electric, etc.), and what kind of pan you use (steel, iron, aluminum, etc.). Some pans will retain heat a lot better than others, reducing cooking time, and vice versa. I used my mini-teppan grill for this steak, because mini-teppan grills are awesome.


It's integral to let steak rest after you take it off the pan. In this case, at least 5 minutes. If you cut into it immediately, all the juices will flow out, and your steak will dry up very quickly. Resting gives the juices a chance to cool down, regain some of its viscosity, and redistribute itself throughout the meat.


Oh, and a trick with potatoes. After you cut them, put them in the microwave for about 2 minutes to par-cook them before you season them and put them in the oven. This drastically reduces the time it takes to roast potatoes like this.

The potatoes above only took about 25 minutes in a conventional toaster oven at 375 degrees.

Hope everyone had a good long weekend!

Sunday, June 29, 2008

Nikujaga

Today's dish is a meat and potato dish called nikujaga, which quite literally means "meat-potato." Fair enough. It's a popular home-style dish, and synonymous with Japanese comfort food.


The traditional recipe calls for thinly sliced beef, like that used in sukiyaki. But I like large chunks... because why not. The beef I'm using here is prime chuck. You could easily make this dish with pork or chicken. The flavor won't change too much.


Our vegetables from left to right: 2 medium potatoes, 1 medium onion, a handful of baby carrots. They don't need to be baby carrots, I just had a bag of 'em lying around.


So we start by browning the beef over high heat.


Just until they pick up some color.


At this stage, the meat will still be around medium-rare.


Then we add our vegetables, chopped into bite-size pieces to match the beef.


This is sauteed for around 5 minutes, just until the onion starts to cook.


Then we add enough dashi broth just to cover. Here we are using about 2 and a half cups. Dashi is sold in most Japanese markets in a granulated form in packets, so making dashi broth really involves just adding water.


When this comes to a boil, the heat is turned down to around medium/medium-low, and we cover, and simmer for about half an hour, or until the potatoes soften. After which, we add around 2 tablespoons each of soy sauce and sake. Then we add brown sugar to our liking. Of course, the soy sauce and sugar can be substituted for bottled sukiyaki sauce. Same ingredients~ Sukiyaki sauce can border on the sweet side though, so balance it out with some salt, or more soy sauce if it's too sweet for your tastes.


Cook uncovered over low for another 8 minutes or so to reduce the liquid and cook the alcohol out of the sake.


By now, the onions have dissolved, and, combined with the starch from the potatoes and reduced broth, forms a nice sauce. There's not too much sauce, but just enough to coat the meat and vegetables.


Served with some white rice, and this stew is Japanese comfort food at its best.


Nom.


Oh, and no bonsai tree update today.... nothing's happened.

... tear.

Saturday, June 28, 2008

Sukiyaki

So the window that I thought was North facing was actually the exact opposite, meaning my bonsai is now DOOOOOOOMED.

The window I moved it to now isn't North-facing either. It turns out there are no North-facing windows at all in my office. How sad. This window is at least next to my desk.

Anyway, a week in, and no sprouts yet. We'll see.

---

So I've decided to make a couple Japanese dishes every weekend. Today's dish is sukiyaki, a style of nabemono, or "steamboat," the Japanese take on the hot pot, where thinly sliced meats are simmered with vegetables in a dashi broth.

Dashi is made by boiling together konbu, a type of edible kelp, and kezurikatsuo, shavings of dried tuna more commonly known as bonito. The resulting broth forms the base of many dishes, such as miso soup, noodle broths, and of course, nabemono soups.

Many consider dashi to be fundamental to Japanese cuisine. Shizuo Tsuji, author of Japanese Cooking, A Simple Art, writes, "many substitutes for dashi are possible, but without dashi, dishes are merely
a la japonaise and lack the authentic flavor."

Thus, I was willing to bike 8 miles to a Nijiya Market to get some.

"Osen"-style sukiyaki comes from a great Japanese television series "Osen," which is about a traditional Japanese restaurant and its struggles in facing modernization. The way they prepare sukiyaki in the series is a step away from what I've seen before, but it was intriguing, so I thought I'd prepare sukiyaki today in that way.


It starts with the beef. This is prime rib-eye, sliced thin. $19.99/lb at Nijiya Market. Expensive as balls, but I biked 8 miles to get there, so I figured what the hell.


These are the vegetables that will go in later. From left to right: firm tofu, scallions, enoki mushrooms, and napa cabbage. In the show, they use just fried tofu and another vegetable called shungiku, which are garland chrysanthemum leaves. Traditional sukiyaki also uses this (as do many Chinese hot pot dishes), but I'm personally not a big fan, as they're relatively bitter.

Here is where Osen-style sukiyaki differs from traditional sukiyaki, and also where I differ from Osen-style sukiyaki. In the series, they use a clay pot instead of a soup pot. I don't have a clay pot, so I'm using my mini-teppan grill. Also, rather than make the soup and cook the vegetables first, Osen-style sukiyaki browns the meat first.

Traditionally, onions are browned in butter before the broth and other vegetables are added. And the meat actually goes in last.


Here we are browning the meat first, almost like teppanyaki, a form of Japanese bbq where meats and vegetables are cooked on an iron griddle.


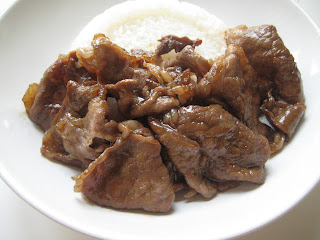
When the meat reaches medium-rare, that is when we add the sukiyaki sauce, which is a combination of soy sauce, sugar, and mirin (Japanese rice wine). Japanese markets usually have pre-mixed sukiyaki sauces.


The meat is simmered in the sauce for just a moment, and then removed.


In both the Osen-style and traditional sukiyaki, this meat (as well as the vegetables that are cooked later), are dipped in raw egg, and then eaten. I'm not too big on raw egg, so I just serve it over a steaming bowl of white rice.


Nom.


In Osen, the dashi broth is then added to the pot that the beef was cooked in, picking up all the meat juices and the remaining sauce. Unfortunately, my mini-teppan grill was a little shallow, so I had to mix a little of the broth in to pick up the sauce and juice, and then transfer that over to a taller soup pot.

The vegetables are then added. The noodles on the top are yam noodles called shirataki noodles. They're much chewier than noodles such as ramen or udon.


Covering and simmering lets all the flavors meld together. Especially in the tofu. In traditinal sukiyaki, the tofu is seared before stewing in the broth, and in Osen-style sukiyaki, the tofu is deep fried. These methods provide the tofu with a firmer texture on the outside, preventing the tofu from just falling apart as you try to pick it up. I just prefer straight up tofu, but it's all good~


With some of my leftover meat added back in because it had cooled, this is what traditional sukiyaki would look like. The raw meat is added at the very end, after the broth and vegetables have simmered away, and cooked to a medium rare-state, and eaten immediately.

I personally prefer the Osen-style where the meat is cooked first, as it allows for a slight char on the outside of the meat, but it is a little troublesome, especially in my case, where I had to switch pots.


Regardless, it was awesome, especially with a bottle of Calpico~